
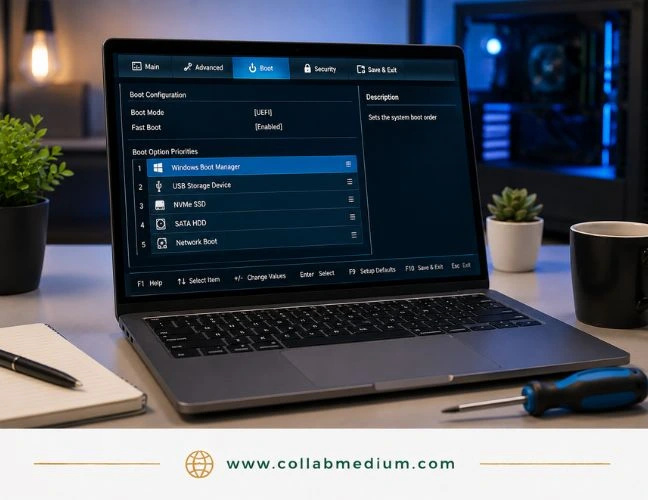
Your computer refuses to start the way you expect, and the culprit is usually the BIOS Boot Order. This single setting tells your machine which drive to check first when you power it on. Get it wrong, and you land in an endless loop, a blank screen, or the wrong operating system entirely.
Quick answer: The BIOS Boot Order is the priority list your motherboard follows when searching for a bootable drive. You change it by entering the BIOS or UEFI setup screen during startup, usually by pressing F2, F10, F12, Delete, or Esc, then reordering the boot devices so your preferred drive loads first. Fixing this setting solves most “no bootable device” errors, USB installer failures, and dual-boot conflicts within minutes.
I have spent years troubleshooting desktops and laptops for readers who hit a wall the moment their screen goes black. This setting is one nobody thinks about until it breaks something important. This guide walks through exactly how it works, why it fails, and how to fix it for good.
What Is BIOS Boot Order and Why It Controls Everything
It is the sequence your motherboard’s firmware follows when it searches for an operating system to load. Every time you power on a computer, the BIOS scans connected storage devices in a specific order. It checks the first device on the list, and if that device has no valid boot files, it moves to the next one.
The BIOS Boot Order matters because modern computers often have several bootable devices connected at once. You might have an internal SSD, a secondary hard drive, a USB flash drive, and a DVD drive. Without a correct setting here, your system might try to boot from an empty USB port and hang there instead of loading Windows or macOS.
Most people never touch this menu because manufacturers set a sensible default. That default usually points to the primary internal drive. Problems start when you install a new drive, plug in a bootable USB stick, or update your firmware, since any of these events can reset or scramble your saved priorities without warning.
Boot Sequence vs Boot Priority vs BIOS Boot Order
These terms get used interchangeably, but a little clarity helps. Boot Sequence describes the actual order devices get checked during startup. Boot Priority is the ranking system inside the menu that decides which device wins that sequence. Boot Device Priority is simply another label some motherboard brands use for this exact same feature.
Dell, HP, Lenovo, and ASUS all use slightly different menu names. Some call it Boot Option Priorities. Others label it Boot Sequence directly on the main screen. Regardless of the wording, you are always adjusting the same underlying logic behind this setting.
The Core Problem: Why This Setting Trips Up So Many Users
Here is the frustrating scenario I hear about constantly. Someone tries to reinstall Windows from a USB drive. They plug it in, restart the computer, and nothing happens. The machine boots straight into the old operating system instead of the installer.
The issue almost always traces back to an incorrect BIOS Boot Order. The internal drive sits ahead of the USB port on the priority list, so the firmware never even glances at the USB stick. This single misconfiguration wastes hours for people who assume their installer file or USB drive is broken.
Dual-boot users face a related headache. If you run Windows alongside Linux, an update to one operating system can silently rewrite your saved boot priorities. Suddenly your Linux partition disappears from the startup menu, even though the files are still intact on the drive.
Common Signs Your Boot Priority Needs Attention
A “No bootable device found” message on a black screen is the clearest sign. A computer that boots into an old operating system after you tried installing a new one also points to this menu. If your PC ignores a bootable USB drive entirely, check this setting before assuming the drive itself failed.
How to Fix the BIOS Boot Order Step by Step
Start by restarting your computer and watching the very first screen. Most motherboards display a brief message telling you which key opens setup. Common keys include F2, F10, F12, Delete, and Esc, and the exact key depends on your manufacturer.
Once inside the BIOS or UEFI setup utility, look for a tab labeled Boot, Boot Order, or Boot Priority. Navigate using your arrow keys if you are in a legacy BIOS, or click through with your mouse if you have a modern UEFI interface with graphics.
Locate the current list of connected devices. It typically shows every drive you have installed, including internal storage, USB devices, and optical drives. Move your preferred device to the top of the priority list using the plus and minus keys, drag-and-drop, or on-screen arrows, depending on your motherboard brand.
Save your changes before exiting. Almost every BIOS uses F10 to save and exit, though some display an explicit “Save and Exit” menu option instead. Skipping this step means your edits never actually apply, and the computer reboots with the old settings intact.
Fixing the Boot Sequence for a USB Installer
If you are installing an operating system from USB, move that drive to the very top of the list temporarily. Once the installation finishes, return to setup and restore your internal drive to the top of the list so the machine boots normally afterward.
Some motherboards offer a one-time boot menu, often triggered with F12, that lets you pick a boot device without permanently altering your saved settings. This shortcut saves time if you only need to boot from USB once and do not want to touch the saved order itself.
Fixing a Dual-Boot Setup
Dual-boot users should set their boot manager, such as GRUB or Windows Boot Manager, as the top entry in the priority list. That manager then presents its own menu for choosing between operating systems. If GRUB vanishes after a Windows update, check the BIOS Boot Order first, since Windows updates sometimes push Windows Boot Manager back to the top of the list.
Tools and Platforms That Make Boot Troubleshooting Easier
Rufus and balenaEtcher both create bootable USB drives correctly, which removes one common variable when a boot fails. If the drive itself was written incorrectly, no change to this setting will fix it.
Manufacturer support pages from Dell, HP, Lenovo, and ASUS publish exact key combinations and menu screenshots for their specific BIOS versions. These pages are worth a quick search whenever a generic guide does not match what you see on your screen.
If you are also chasing sluggish performance once your machine finally boots, our guide on how to fix slow MySQL queries covers a different but related kind of troubleshooting mindset, working methodically through the most likely cause first. And if boot issues pop up while setting up a new machine for school or work, our best laptops for students guide is a useful next stop for picking hardware that avoids common startup headaches in the first place.
Boot Priority Settings Compared Across Brands
| Brand | Setup Key | Menu Name | Boot Style |
| Dell | F2 or F12 | Boot Sequence | UEFI with legacy option |
| HP | F10 or Esc | Boot Order | UEFI with legacy option |
| Lenovo | F1 or F2 | Boot Priority Order | UEFI with legacy option |
| ASUS | F2 or Delete | Boot Priority | UEFI, graphical EZ Mode |
| MSI | Delete | Boot Option Priorities | UEFI, graphical Click BIOS |
Setup keys and menu names can vary by model year, so confirm with your exact device manual if these do not match.
Common Mistakes to Avoid With Boot Order Changes
Forgetting to save before exiting. Pressing Esc instead of F10 discards every change you just made here.
Enabling Secure Boot conflicts. Some USB installers will not appear in the device list at all until you temporarily disable Secure Boot.
Mixing up Legacy and UEFI modes. A drive formatted for UEFI will not show up correctly in this menu if your system is set to Legacy mode, and vice versa.
Leaving the USB drive as the top priority permanently. This slows down every restart while the firmware checks an often-empty USB port before moving to your main drive.
Ignoring firmware updates. A motherboard firmware update can sometimes reset the entire BIOS Boot Order back to factory defaults without notice.
Pro Tips From Years of Troubleshooting Boot Issues
Tip 1: Label your drives clearly in BIOS. Many UEFI menus show drive model numbers instead of friendly names. Jot down which model number corresponds to which physical drive so future edits go faster.
Tip 2: Use the one-time boot menu for testing. Before permanently changing this setting, use F12 or your manufacturer’s one-time boot key to confirm the device actually works.
Tip 3: Take a photo of your original settings. Snap a quick picture with your phone before making changes. This gives you a reference point to restore the original boot priority if something goes wrong.
Tip 4: Update firmware before troubleshooting further. According to Dell’s official support documentation, outdated BIOS versions can cause boot device detection issues that a simple priority change will not resolve on their own.
Tip 5: Reset to defaults as a last resort. If your BIOS Boot Order looks scrambled beyond recognition, most setup menus include a “Load Optimized Defaults” option that resets everything cleanly.
Why Getting This Setting Right Matters More in 2026
Modern laptops increasingly ship with NVMe drives, Secure Boot enabled by default, and UEFI-only firmware with no legacy fallback. This means the boot menu looks different than it did five years ago, and some older troubleshooting advice simply does not apply anymore.
Windows 11 also requires Secure Boot and TPM 2.0 for a clean installation, which ties the BIOS Boot Order more tightly to security settings than in previous versions of Windows. A misconfigured priority list combined with disabled Secure Boot can block an otherwise valid installer from working at all.
Cloud recovery tools have also changed the picture. Many manufacturers now build in the option to boot directly into a recovery partition through this same menu, skipping the need for external media in some repair scenarios.
Frequently Asked Questions
What is BIOS Boot Order?
BIOS Boot Order is the priority list your motherboard follows when searching for a device to boot from. You access and change it through the BIOS or UEFI setup screen during startup.
How do I change the BIOS Boot Order?
Restart your computer and press the setup key shown on screen, usually F2, F10, F12, Delete, or Esc. Then navigate to the Boot tab and reorder devices before saving with F10.
Why does my computer ignore the boot order I set?
Secure Boot conflicts, Legacy versus UEFI mismatches, or a recent firmware update can all override saved boot settings. Check these settings if your changes do not stick.
Can a wrong BIOS Boot Order damage my computer?
No, an incorrect boot order will not damage your hardware. It only affects which device the system checks first, and it can always be corrected by returning to setup.